

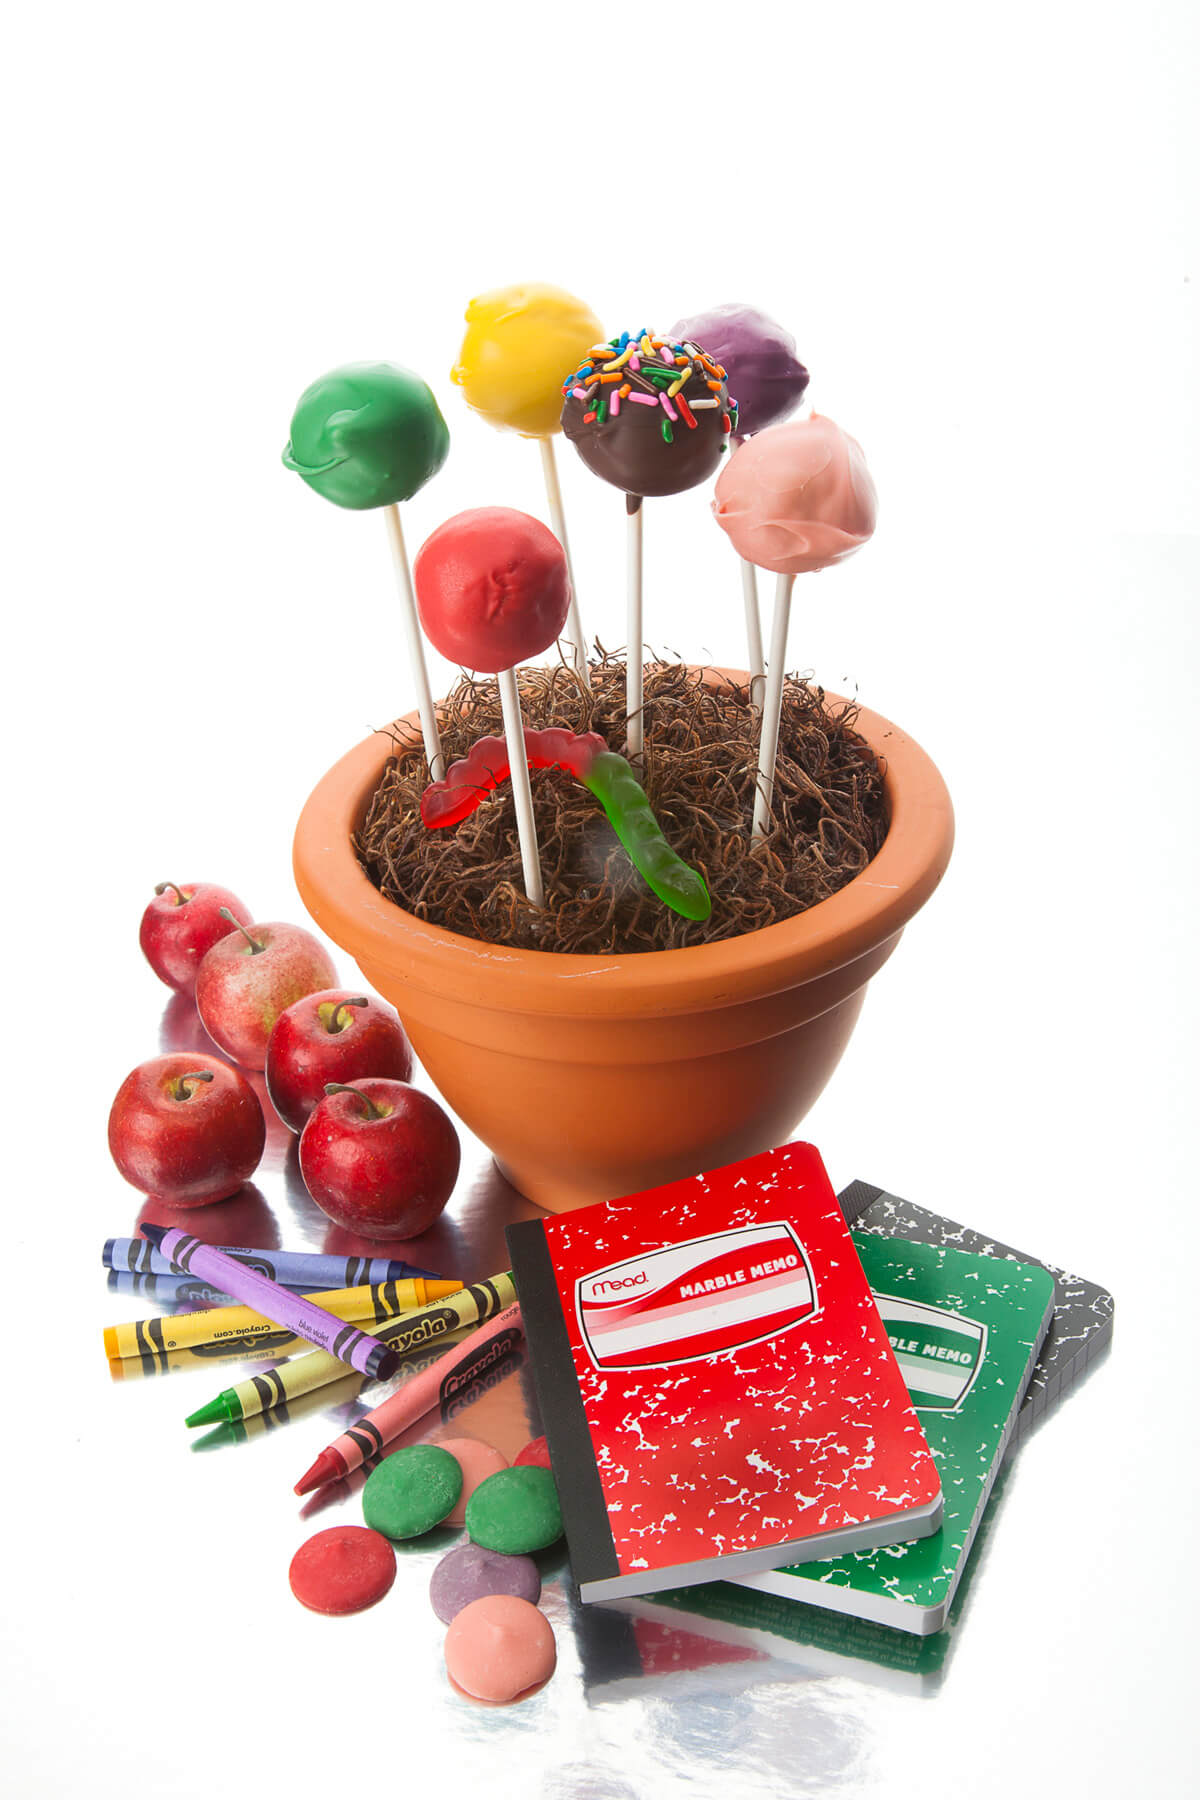
Knowing that I’m a kid at heart, my daughter, Sally, bought me a Cake Pops kit by Bakerella for Mother’s Day. Cake Pops have taken the cake world by storm ever since they were developed by Angie Dudley, creator of the wonderful Bakerella website and blog. Cake pops are so much fun to make and decorate, and the end results are so pretty to display and so delicious. They are a creative baking and decorating project to do with kids as they are transitioning from summer fun to more structured back to school routines. They make tasty lunch box and after school treats, and are great to serve at kids parties as dessert or favors. Welcome Back to School!
Ingredients
- 18.25 ounce box of cake mix*
- 16 ounce container of prepared frosting**
- Three 12 ounce packages of candy coating or melts
- small container of Crisco
- sprinkles or colored sugars (optional)
Before you begin make sure to have on hand a 13 x 9-inch baking pan, a large mixing bowl, 4-ounce microwave safe cylindrical plastic containers*** cake pop stand or Styrofoam block, and lollipop sticks.****
Bake the cake mix in a 13 x 9-inch baking pan according to the package directions.
When the cake is done, remove it from the oven and allow it to cool in the pan for 5 minutes.
Flip the cake out of the pan onto a cooling rack. Place another cooling rack over the cake and re-flip it so that it is right side up. Allow the cake to cool completely.
Crumble the cake into a large mixing bowl. You can do this all by hand. Or you can use a knife to cut the cake into small pieces and then crumble by hand.
Place about 3/4 of the container of frosting into the bowl and mix the cake crumbs and frosting until well combined.
Roll by hand 1 1/2-inch cake balls. Place them on a baking sheet lined with wax paper. Place in the freezer for at least 15 minutes. You can keep the cake balls in the freezer for a couple of weeks or in the refrigerator for several days.
While the cake balls are in the freezer, melt the candy coating. Place about 3 ounces or two large handfuls of melts into a 4-ounce microwave safe plastic container. Add about 1/2 teaspoon of Crisco to the melts, then place in the microwave on medium power for one minute. Remove and stir the melts. Repeat this process until all the candy coating is fully melted and smooth. You can use different colors of candy melts if desired.
Remove several cake balls from the freezer and allow to rest at room temperature for about a minute. Take a lollipop stick, dip it about 1/2 inch into the candy coating, then insert the dipped part of the lollipop stick about halfway into the cake ball.
Dip the cake ball into the melted candy coating, making sure it is totally submerged. Lift the cake pop out of the candy coating allowing any excess to drip back into the bowl. Place finished cake pop onto a cake pop stand or Styrofoam block.
If desired, sprinkle with colored sugars, or sprinkles before the coating dries.
Repeat the process until you have your desired amount of cake pops.
You can keep the finished cake pops covered with plastic wrap at room temperature for a day or two, or in the refrigerator for 5 days
An 18.25 ounce box of cake mix will make about 48 cake pops.
Essex Fells Magazine
September 2013
Notes
* I used Duncan Hines French Vanilla Cake mix, but feel free to use other mixes, such as yellow cake, chocolate cake, banana cake, carrot cake, confetti cake, etc.
** I used Duncan Hines Classic Vanilla Frosting, but there are other flavors available such as chocolate, cream cheese, lemon, etc.
*** I use Rubbermaid Easy Find Lids .5 cups. They are about 2 ½ inches high and 2 ½ inches in diameter.
**** Cake pop stands, Styrofoam blocks and lollipop sticks can be found at either Party City or Michael’s Krafts.

Leave A Comment
You must be logged in to post a comment.